Thursday, January 31, 2019

Art Elements - January Reveal

I am so thrilled to be a part of the official Art Elements Challenge reveal this month! (Unlike last month, where I was too late to join in... I blame making so many Christmas presents, heh.) 

The theme this month was the Moon--and what an inspiring, interesting theme that was. There are so many different ways to interpret it, after all. I personally ended up exploring two different possible interpretations. Overall, I made three things for this reveal: a pair of earrings, and two twin necklaces.

And, without further ado... Here's what I made!


Bright Summer Nights
Earrings


Those Czech glass coin beads are actually what inspired me to join in this challenge. I was organizing my stash when I found them. I have no memory of buying them, and there were only two of them... and, with their stars and crescent moons, they were perfect for this theme.

For the design, I wanted to make a simple pair of earrings that really showed off the beauty of the beads... Well, that, and I wanted an excuse to make more earwires. (I have been having so much fun learning how to make them! Woo!) To that end, all of the wire components--the headpins and the earwires--are made by me using copper wire.


I really love the bright combination of blue and copper. These make me think of bright summer nights--right after the sun has set and the moon has risen, but the sky is still light.


Light Side and Dark Side of the Moon
Twin Necklaces


For these necklaces, I took a much more literal approach to the moon theme. I absolutely love astronomy... As such, when I first think of the moon, I actually think of the physical sphere that is orbiting our planet. Its rock is barren and battered--not particularly glamorous in its own right, but gorgeous when it reflects the light of the sun.

Thinking of the light side and dark side of the moon is what inspired these necklaces. They are both made with the same type of stone, but one is made with bright silver while the other is made with dark bronze.


The stone itself was chosen because, like the moon, it is deceptive. Upon first appearance, it is simple and uninteresting. When the light hits it, though, its unique pattern emerges--and its irregularities become beautiful.


I am really thrilled with how these two necklaces turned out. I know I say that a lot, but it's true... It's so satisfying when I have an idea in my head, and I am able to make them a reality. I love how a different metal can make each one look so different, and yet obviously part of a whole. 

...And I really do love the way that the stone is so subtly interesting. 


So, there you go! These are pieces I made for this Art Elements theme challenge. I really enjoyed exploring this theme, and I'm thrilled to be able to share my creations with you.

Thank you so much for stopping by today to see what I made... Be sure to visit the other participants to see what beautiful things they created!

Thanks again, everyone. I hope you all have a lovely day! 

Wednesday, January 30, 2019

Pretty Palettes - January Reveal

It's Wednesday! That means I get to answer a very important question: what have I been up to this week? ...Besides being cold, that is. (I'm in the Midwest, so helloooooo -30 degree windchill. Oi.)

Well, this week, I've been finishing up the necklace I made for this month's Pretty Palette challenge! Hurray!


...This palette is very, very aptly called Sweater Weather. It is definitely sweater weather here in Cincinnati! (Yep--this is the time for sweaters, and heavy coats, and gloves, and scarves, and...)

The necklace that I made for this Palette strays a little from the original colors--namely, it adds a little bit of purple--but I am very, very happy how it turned out.

And, without further ado, here it is!


The focal bead is labradorite... it has a beautiful, subtle flash. The rest of the necklace is made with a combination of rose quartz, Czech glass, and crystal.


...I really do love tassels, and this one is no exception. I love the soft colors, and the way that it sways when worn. I hardly ever put pink and grey together, but I think I may change that... this necklace makes me very happy. :)

Thanks so much for stopping by today to see what I've been up to! Be sure to swing by tomorrow, too... I'm working on another reveal, and am excited to share it with you!

Until then, have a wonderful day, everyone!

Monday, January 28, 2019

Tutorial - Cutting Paper Bead Strips

I make a lot of paper beads. So many, in fact, that I have received a request to show how I cut the strips to make all of those paper beads. 

So, here you go... my very first Wonder and Whimsy tutorial! Woo!


Step 1: 
Gather materials


To cut the strips for my paper beads, this is what I use: the paper in question, a ruler, a writing implement, and a paper cutter. 

I use all sorts of paper for my beads--from junk mail to sketch paper, and everything in between. In general, the thicker the paper, the thicker the bead will be. For this demo, I used a 12 x 12 piece of scrapbooking paper.


Step 2:
Measure and mark


In general, I make my beads 3/4 of an inch long. (I find that one inch is a little too big, and a half inch is a little too small. So! 0.75 inch, it is.)

So, for this step, I turn my paper over to the back, put my ruler to the bottom of the paper, and put a mark at every 3/4 of an inch. Simple enough. :)


Step 3:
Measure and mark, round 2


The paper bead strips I make are essentially very long, skinny triangles.

So, after the first side is completely marked, I turn the paper around so that I'm now dealing with the parallel side. The idea is that I am now going to mark the other side of the triangles. 

For this reason, the first mark that I make on this side is actually at 0.375 of an inch--half of 0.75 inches. My ruler makes this super simple, but eyeballing it is fine.


Once that first mark is down, I then measure and mark at 0.75 inch intervals--just like I did on the previous side.

When I'm done, this is what it looks like:


That is probably the most boring picture I have ever posted on my blog--hah! Hopefully it still helps show what I mean. Oh, and I put a little box on top of the very first mark I make, just so I know how to orient my paper... That little box is always in the bottom right. It's not essential; it just helps me keep everything straight in my mind.


Step 4:
Connect the dots


Essentially, this is the step where lines are drawn to connect the little marks on either side of the paper. This forms the skinny triangles that become the strips. 

For this step, I put the bottom of the ruler on the edge of the paper, and the top of the ruler on the first 0.375 inch mark that I made. This line is diagonal; this is one side of the triangle.  I trace that first line. 

I then leave the top of the ruler where it is, and shift the bottom of the ruler over to the next mark (in this case, the one where I drew the box). I trace that line. Then I shift the top of the ruler over to the next mark, leaving the bottom of the ruler in place, and trace that line. I repeat this zig-zagging down the length of the paper, until each pair of lines have been drawn--and the paper is full of triangles.

Do keep in mind that this step is purely optional. In fact, I rarely do it. I've done this so much that these lines are no longer necessary for me. Still, it would probably be good to do until you feel comfortable visualizing the strips. You'll notice that in the pictures to come, I've only drawn a few of them. :)


Step 5: 
Cut


And now, it's time to cut! Yay! 

This is where I line up the end marks with my cutter, and slice along the line that has been drawn.


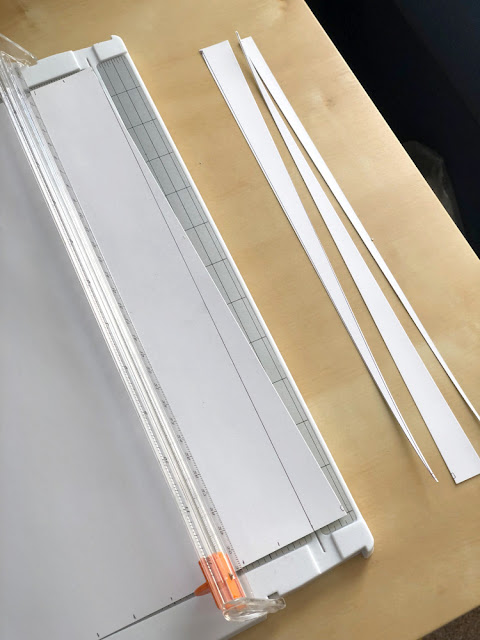
Now, I mentioned that I hardly ever draw the lines. Instead, to cut, I simply line up the top and bottom marks, and slice where the line would be:


Here is another picture, to hopefully give you a better image of what it looks like:


Just as when I was drawing the lines, I zig-zag down the paper. Above you can see the end result, with half of the strips facing one way, and the other half facing the other.


Step 6: 
Yay! Paper Strips!


Once all the strips are cut, I then turn them over and stack them up. And, ta-da, that's it! That is a quick and simple way to cut paper bead strips. 

...Actually rolling and sealing the beads, well, that's for another tutorial. (And for when I get another pair of hands, because actually making the beads and taking pictures at the same time--hah! People who do tutorials have my utmost respect.)

I do hope that this has been helpful. If there are other tutorials that you want me to try to make, please let me know! I can't guarantee that I'll be able to do them (see previous statement about needing more hands), but I'd love to hear your ideas.

Thanks so much for stopping by today... Have a wonderful week, everyone!

Friday, January 25, 2019

Wonder and Whimsy Monthly Challenge - January Reveal

It's reveal time!

That's right... it's the last Friday of the month, which means that I get to show off what I made for this month's Wonder and Whimsy challenge. Hurray!

What was my challenge? To make something lovely with these materials, sent to me by one of my new beading friends:


...And make something, I did! Four somethings, in fact. I am delighted to say that I was able to use each of the pendants that she sent me, as well as some of the beads. What can I say--I was inspired by such lovely materials.

So, without further ado, here is what I made!


Necklace 1


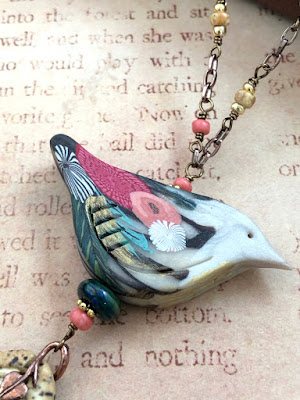
I am so very excited... This was the very first Humblebeads birdie that I ever got to play around with. I've always admired them, but never had the opportunity to work with one--until now! :)


I paired the birdie with a lampwork bead (artist unknown), and a lovely ceramic feather (made by the talented Karen Totten). I then went digging through my stash for beads--and chain--to match.


I placed the beads in a random pattern, wire-wrapped them, and put links of chain between them. The overall necklace is quite long, so it has no clasp. I love the weight of the necklace--it is substantial but not overbearing. 


I also really like the combination of colors... they are not ones that I usually use, and it was fun exploring the balance of the different shades. 

Overall, I'm really happy with how this necklace turned out--and, since this was first piece that I made, it was a great way to start this challenge.


Necklace 2


This second necklace was made with the beautiful ceramic tree pendant, as well as quite a few of the Czech glass beads that my friend included in her package. I paired those materials with freshwater pearls, Czech glass from my own stash, and some other different shapes and sizes of glass.


For the clasp, I used a beautiful piece by Saki silver. Technically it's a different metal from the rest of the necklace (bronze, instead of silver), but I absolutely love the way it pairs with the pendant--the color, the texture, the shape, everything. 

Now, I may end up changing it--or I may remake the necklace in bronze--but for right now, this is the design. (Hah. I was actually going to remake it in bronze before this reveal, but I ran out of time. Who knows, though... maybe I'll leave it as it. *grin*)


Necklace 3
(with bonus!)


For this one, I had to do some emergency bead repair surgery. Unfortunately, while I was designing this necklace, I broke the butterfly. Thankfully, my repair was successful, and I was able to complete this:


Bronze! Copper! And purple! ...And very, very mild asymmetry. 

The necklace itself is made with Czech glass, dyed quartz, and faceted glass. I absolutely love this color combination... although, truth be told, I had to go through at least three different iterations of this design before I came up with one that I liked. 

I'm glad that I put in the extra design time, though... I really, really like how this necklace turned out. 


Oh! And I mentioned that there was a bonus with this necklace.

Here it is:


Earrings! Complete with my very first ever pair of self-made earwires. That's right--I made those earwires. Woo-hoo!


I also made those headpins, too. (My parents got me a metal-working hammer for Christmas, and I'm so excited. Fun with wire!)

Overall, I am very pleased with how this set turned out--from emergency bead repair, to trying something new, to going through different designs until finding just the right one. Persistence paid off!


Necklace 4

For this necklace, I did something a little bit different. I had used up all the pendants, but I still had quite a few beads left. 

So! Inspired by last month's challenge, I decided to learn another chainmaille weave.


...The shaggy loop weave, to be precise.

Now, this isn't the first piece of shaggy loop weave that I've made this month. If you follow my Instagram, you'll have seen a necklace I made for this month's Bargain Bead Box. Still, this one is decidedly different--different metal, different size, different color. I always think it's fun to see how the same construction can be used to achieve different looks, and this was no exception.


To make this necklace, I used large 8mm jumprings paired with some unique chain from my stash. The blue seed beads were from the package. I really love how it turned out--unique and fun, and using minimal materials. 


Ta-da! Those are the pieces that I made for this month's challenge. It was so fun playing with the beads that my friend sent me... and I still have more to use! Woo-hoo!

Oh, and you may have noticed--I also succeeded at my other, unspoken part of this challenge: not make a single tassel. Hah! I am capable of making things that aren't tassels. :)

Thanks so much for stopping by today to see what I made... I really enjoyed myself with this challenge, and I hope that shows. And many, many thanks to my new friend for the wonderful beads that you sent me! :)

Have a wonderful weekend, everyone!